Techniques for Creating Realistic Highlights and Shadows

Anime eye coloring tutorial – Mastering highlights and shadows is crucial for bringing anime eyes to life, transforming flat color into captivating depth and realism. The skillful application of light and shadow mimics the way light interacts with a three-dimensional form, creating a believable and engaging portrayal of the eye’s structure. This involves understanding how light sources affect the eye’s curvature and the resulting reflections and shadows.
Realistic highlights and shadows are achieved through a combination of precise color placement and blending techniques. Highlights, often bright and intense, accentuate the glossy surface of the eye, suggesting moisture and shine. Shadows, conversely, define the eye’s form, revealing its depth and contours. Effective use of gradients smoothly transitions between these light and dark areas, creating a seamless and natural look.
Highlight Application for Shine and Depth
Highlights are key to creating the illusion of a shiny, wet-looking eye, so common in anime style. Strategic placement emphasizes the rounded form of the eyeball. For instance, a small, intensely bright highlight placed near the center of the iris suggests a direct light source reflecting off the eye’s surface. A slightly softer, less intense highlight might be added near the tear duct to further enhance the three-dimensionality and capture the subtle light reflection in that area.
The size and intensity of the highlight will vary depending on the light source’s strength and angle, and the overall mood of the illustration. Consider using a lighter, almost white color for the most intense highlight points, gradually blending it into the surrounding iris color.
Shadow Techniques for Dimension and Form
Shadows are equally important for creating realistic-looking eyes. They define the form, suggesting the curve of the eyeball and the depth of the iris. For example, a darker shadow might be placed along the lower eyelid to create a sense of depth and to define the eye socket. Another shadow might be placed on the inner corner of the eye, in the crease where the eyelid meets the eyeball.
The intensity and color of the shadow will depend on the light source and the overall tone of the piece. Remember, shadows are not simply black; they often take on the color of the surrounding environment or the color of the object casting the shadow. Experiment with slightly desaturated versions of your base colors for a more natural shadow effect.
Gradient Blending for Smooth Transitions
Gradients are essential for seamlessly blending highlights and shadows, avoiding harsh lines and creating a more realistic and polished look. A smooth gradient between a highlight and the surrounding iris color will make the highlight appear less artificial and more integrated with the overall eye design. Similarly, a gradual transition from shadow to the base color will create a more natural-looking shadow, avoiding a stark contrast.
This can be achieved digitally using various blending tools and techniques, or traditionally through careful layering and blending of paints or pencils. Imagine a gradual shift from a bright, almost white highlight to a mid-tone iris color and then to a dark shadow – this smooth transition is the key to realistic eye rendering.
Advanced Techniques
Mastering basic shading and highlighting is only the beginning of your anime eye coloring journey. This section delves into advanced techniques that will elevate your artwork from competent to captivating, allowing you to express a wider range of emotions and styles. We will explore methods for creating special effects, adding textures, and adapting your approach to different anime aesthetics.
So, you’re tryna master that anime eye coloring tutorial, eh? Getting those gradients just right is a real struggle, almost as tough as figuring out which organelle is which in that animal cell! Luckily, you can check out this animal cell coloring answer key for a bit of a break, then get back to perfecting those sparkly anime peepers.
It’s all about that detail, kan!
Creating Glowing Eyes and Reflective Surfaces
Achieving a realistic glow in anime eyes requires a nuanced understanding of light and color. The key lies in layering multiple colors and using blending modes to create a sense of depth and luminosity. Begin by establishing a base color, then add a lighter, more saturated color on top, focusing it on the center of the iris. To enhance the glow, use a soft brush with a bright, almost white color, and apply it in small strokes around the light source.
For reflective surfaces, such as a character’s eye reflecting a light source, you would mirror the shape of the light source within the eye, using a highly saturated color that mirrors the original light source’s color. This reflected light should be brighter and more intense than the surrounding areas. Experiment with blending modes like “Overlay” or “Screen” to intensify the glow and reflection.
Subtle variations in color saturation and brightness will greatly affect the realism and vibrancy of your result.
Adding Textures to the Eyes
Adding texture to anime eyes can significantly impact their expressiveness and realism. To create sparkling eyes, begin by adding small, bright dots of varying sizes throughout the iris. These dots should be subtly lighter than the base color. You can further enhance the sparkle by adding a subtle glow or light reflection to each dot. For a watery effect, use soft, translucent brushstrokes of a slightly lighter blue or grey to mimic the movement and reflection of water.
Pay attention to the way light refracts and reflects off the surface of water, creating subtle highlights and shadows. Consider using a slightly blurred brush to achieve a softer, more realistic watery effect. The application of these techniques can dramatically alter the mood and personality conveyed by the character’s eyes.
Anime Eye Styles and Coloring Approaches
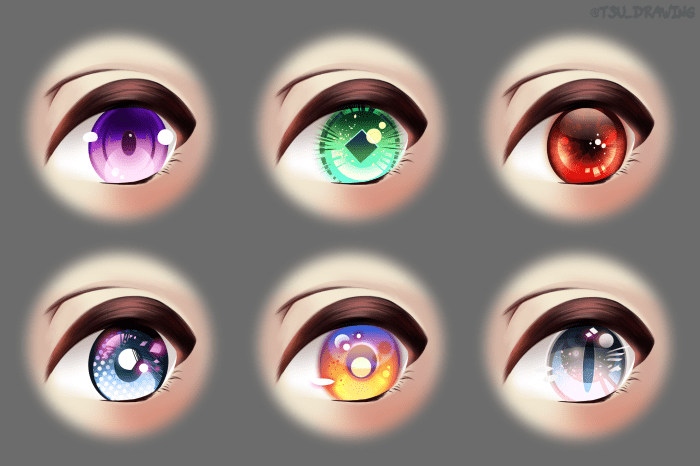
Anime boasts a diverse range of styles, each with its unique approach to eye coloring. Consider the large, expressive eyes common in shojo anime, often characterized by vibrant colors, sharp highlights, and exaggerated shine. These eyes often employ bright, saturated colors, and heavy use of highlights to convey a sense of innocence or youthful energy. In contrast, the eyes in mecha or seinen anime may be more subdued, with a focus on realistic shading and detailing, often using darker, less saturated colors to convey seriousness or maturity.
The style of the anime will dictate the color palette, the level of detail, and the overall approach to coloring the eyes. Understanding these stylistic nuances is key to adapting your coloring techniques to the specific aesthetic you are aiming for.
Illustrative Examples: Anime Eye Coloring Tutorial

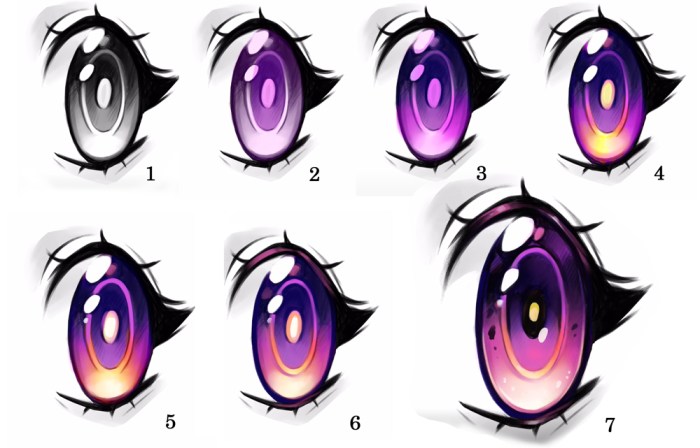
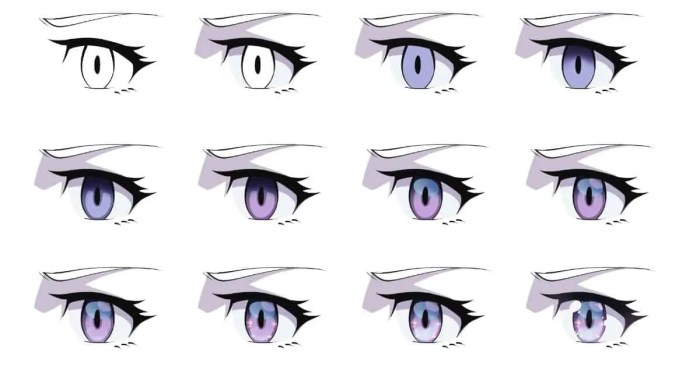
Let’s delve into a practical application of the techniques discussed previously. We will meticulously color a large, expressive anime eye, focusing on achieving depth and realism through careful application of highlights and shadows. This step-by-step guide will illustrate the process, allowing you to replicate the techniques on your own drawings.
Step-by-Step Anime Eye Coloring
This section details the process of coloring a single anime eye, from initial base color to final highlights. Each step is accompanied by a description of the corresponding illustration.
- Step 1: Base Color and Initial Shading. The illustration depicts a clean sketch of a large anime eye, slightly almond-shaped with a prominent lower lid. The iris is initially filled with a medium-toned purple (#8A5A9D). A soft, dark purple (#583769) is used to create a basic shadow under the upper eyelid and along the outer edge of the iris. This establishes the initial form and depth.
- Step 2: Iris Detailing and Mid-tones. Here, we introduce a lighter purple (#B186C8) to the inner part of the iris, creating a subtle highlight and emphasizing the roundness. More of the darker purple (#583769) is added to deepen the outer shadow, creating a clear contrast. A small amount of a very dark purple (#301F3F) is added to the pupil for depth. The overall effect is a more three-dimensional iris.
- Step 3: Refining Highlights and Shadows. The illustration now shows the addition of intense highlights. A very light lavender (#D9C2E0) is used for the brightest highlight, placed near the light source, which we assume is slightly above and to the left of the eye. The dark purple (#583769) is further refined to create a more natural-looking shadow under the upper eyelid and along the iris’s edge.
The transition between light and shadow is softened with blending techniques.
- Step 4: Adding Specularity and Final Touches. A small, intensely bright white highlight (#FFFFFF) is added to the iris to simulate the reflection of a light source. This small detail adds significant realism. The pupil is further darkened, and minor adjustments are made to the shadows and highlights to ensure a smooth, natural-looking transition. The final illustration shows a polished and detailed anime eye, full of depth and expression.
Troubleshooting Common Issues

Even with careful planning and execution, anime eye coloring can present challenges. Understanding common pitfalls and their solutions is crucial for achieving polished, expressive results. This section addresses frequent problems, offering practical strategies to overcome them and elevate your artwork.
Uneven Coloring
Uneven coloring is a common issue, often stemming from inconsistent pressure on the drawing tool or abrupt transitions between colors. This results in patches of varying saturation and tone, disrupting the smooth gradient crucial for realistic anime eyes. To remedy this, practice maintaining consistent pressure while applying color, using gradual transitions between shades. Employ layering techniques, building up color gradually instead of applying it in one heavy stroke.
Consider using blending tools or techniques, such as smudging or airbrushing, to soften harsh lines and achieve a more even finish. For digital painting, utilize tools that allow for smooth color blending, such as the gradient tool or mixer brush.
Lack of Depth
A lack of depth makes anime eyes appear flat and lifeless. This typically occurs when highlights and shadows are inadequately defined or improperly placed. Insufficient contrast between light and dark areas further contributes to this problem. To address this, strategically place highlights to simulate light reflection on the eye’s surface, focusing on the cornea and tear duct. Similarly, carefully rendered shadows in the crease of the eyelid and around the iris create depth and dimension.
Experiment with different shadow colors to enhance the three-dimensional effect; darker, cooler tones generally work well for shadows, while warmer tones can highlight certain areas.
Inconsistent Line Art
Inconsistent line art can significantly impact the overall appearance of colored anime eyes. Jagged or uneven lines can disrupt the smooth flow of the coloring process and detract from the final product. Before coloring, ensure your line art is clean and consistent. Use a steady hand or a stabilizer tool (digital) to achieve clean, smooth lines. If necessary, refine your line art digitally using tools designed for line smoothing and cleanup.
This foundational step will make the coloring process smoother and more effective.
Color Choice and Harmony, Anime eye coloring tutorial
Inappropriate color choices can detract from the overall aesthetic. Clashing colors can make the eyes look jarring and unrealistic. Choosing colors that complement each other and align with the overall color scheme of the piece is essential. Consider using color palettes that offer harmonious color combinations. Understanding color theory—such as complementary, analogous, and triadic color schemes—can guide your color selection.
Additionally, pay attention to the saturation and value of your chosen colors; using a range of saturation levels and values can add depth and interest to the eyes.
Difficulty Achieving Smooth Gradients
Achieving smooth, natural-looking gradients can be challenging, particularly when working with traditional media. Harsh transitions between colors can make the eyes appear unnatural and detract from their realism. For smoother gradients, use layering techniques, applying thin layers of color to gradually build up the desired effect. Employ blending tools or techniques to soften transitions between colors. For digital painting, utilize gradient tools or blend modes to achieve smooth color transitions.
Practice is key to mastering this skill.
